Simply create iPhone ringtones from songs you heard, movies you watched… and transfer to your iPhone directly! All iPhone type supported including CDMA iPhone 4.
Introduction
After forced yourself to buy an iPhone, you will be very excited, as you will be the spotlight in the school. But, when the traditional ringtone yelled, soon you felt thousands of strange eyes. You would rather to use a normal phone with normal ringtone. That will make you at ease. These changes after you meet 4Media iPhone Ringtone Maker. You will get your customized ringtone, unique and special, cool and faddish. Now let take a look how to use this great software to create your own type of ringtone.
Step 1: Download and install 4Media iPhone Ringtone Maker
Click THE FOLLOWING PICTURE to download it.

After the download is finished, run the m-iphone-ringtone-maker.exe and follow the installation wizard instructions.
PS: The window of 4Media iPhone Ringtone Maker is very simple, please see the picture below, I will lead you to find the place to fill the license code and own setting:
Click the angle on the right top of the window and a dropdown list will shown.

Step 2: Select the song that you want to use
To input a song that you are going to edit, please click the “Browse” button on as shown in the following picture.

4Media iPhone Ringtone Maker can supports most popular formats of audio like AVI/ MPEG/ WMV/ MP4/ MP4/ MKV/ H.264/ MPEG-4/ DivX/ XviD/ MOV/ RM/ RMVB/ M4V/ VOB/ ASF/ ASF 3G2/ DAT/ H.261/ H.264. Also it can support some unfamiliar formats: DV/ DIF/ MJPG/ MJPEG/ DVR-MS/ NUT/QT/ YUV/ MPV/ NSV. What’s more, it can support some formats from particular device: Audio-Video/ Interleaved HD/ Video (*.avi)/ AVCHD Video(*.mts, *.m2ts)/ H.264/MPEG-4 AVC (*.mp4)/ MPEG-2 HD Video (*.mpg; *.mpeg)/ MPEG-4 TS HD Video (*.ts)/ MPEG-2 TS HD Video (*.ts)/ Quick Time HD Video(*.mov)/ WMV/ HD Video (*.xwmv)/ MP3/ WMA/ AC3/ AAC/ WAV/ CDA/ OGG/ FLAC/ APE/ CUE/ M4A/ RA/ RAM/ MPA/ MP2/ AIFF/ AU/ SUN AU Format.
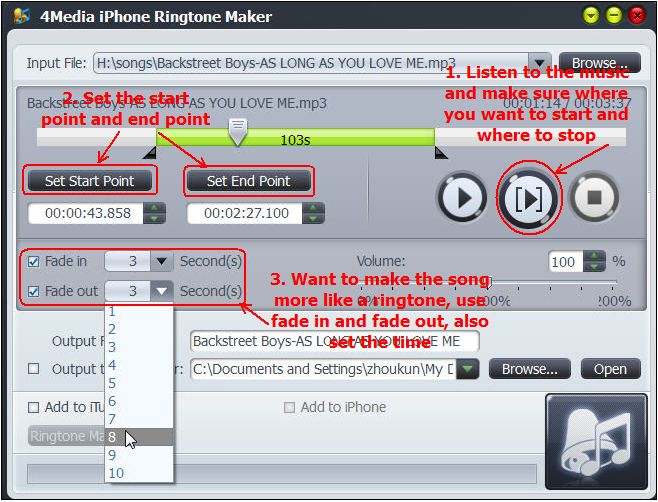
Step 3: Listen to the music and determine the start and end points
Yes, most songs have so much redundancy for a ringtone, we need to cut the useless parts, or wake parts and leave the best.
Click the huge “Play and Pause” button to listen to the music first. Then set a start point by clicking “Set Start Point” button and the “Set End Point” for the end.
Most ringtone will fade in and out. So let’s make your ringtone livelier. Tick fade in and fade out, also you can set the time for this two effects.

PS: If the audio file itself is too loud of low, you can use our voice controller to strengthen or waken the voice. Make it more satisfied.

Step 4: set the target destination to save the ringtone
There is still one more thing we need to do before start converting, that is we need to find a place to save the output file. 4Media iPhone Ringtone Maker give you two choices to save your ringtone. One is to save in your PC, and the other is directly to your iPhone.

Click “Browse” to set a target place for your ringtone in PC. Also portable device is okay for storage.
There will have two more option below the Destination blank as the following picture shows:
Tick “Add to iTunes” to auto-upload the audio to iTunes to your preference.
Tick “Add to iPhone” to send the ringtone directly to your iPhone and then you can use it directly.


Introduction
After forced yourself to buy an iPhone, you will be very excited, as you will be the spotlight in the school. But, when the traditional ringtone yelled, soon you felt thousands of strange eyes. You would rather to use a normal phone with normal ringtone. That will make you at ease. These changes after you meet 4Media iPhone Ringtone Maker. You will get your customized ringtone, unique and special, cool and faddish. Now let take a look how to use this great software to create your own type of ringtone.
Step 1: Download and install 4Media iPhone Ringtone Maker
Click THE FOLLOWING PICTURE to download it.
After the download is finished, run the m-iphone-ringtone-maker.exe and follow the installation wizard instructions.
PS: The window of 4Media iPhone Ringtone Maker is very simple, please see the picture below, I will lead you to find the place to fill the license code and own setting:
Click the angle on the right top of the window and a dropdown list will shown.

Step 2: Select the song that you want to use
To input a song that you are going to edit, please click the “Browse” button on as shown in the following picture.

4Media iPhone Ringtone Maker can supports most popular formats of audio like AVI/ MPEG/ WMV/ MP4/ MP4/ MKV/ H.264/ MPEG-4/ DivX/ XviD/ MOV/ RM/ RMVB/ M4V/ VOB/ ASF/ ASF 3G2/ DAT/ H.261/ H.264. Also it can support some unfamiliar formats: DV/ DIF/ MJPG/ MJPEG/ DVR-MS/ NUT/QT/ YUV/ MPV/ NSV. What’s more, it can support some formats from particular device: Audio-Video/ Interleaved HD/ Video (*.avi)/ AVCHD Video(*.mts, *.m2ts)/ H.264/MPEG-4 AVC (*.mp4)/ MPEG-2 HD Video (*.mpg; *.mpeg)/ MPEG-4 TS HD Video (*.ts)/ MPEG-2 TS HD Video (*.ts)/ Quick Time HD Video(*.mov)/ WMV/ HD Video (*.xwmv)/ MP3/ WMA/ AC3/ AAC/ WAV/ CDA/ OGG/ FLAC/ APE/ CUE/ M4A/ RA/ RAM/ MPA/ MP2/ AIFF/ AU/ SUN AU Format.
Step 3: Listen to the music and determine the start and end points
Yes, most songs have so much redundancy for a ringtone, we need to cut the useless parts, or wake parts and leave the best.
Click the huge “Play and Pause” button to listen to the music first. Then set a start point by clicking “Set Start Point” button and the “Set End Point” for the end.
Most ringtone will fade in and out. So let’s make your ringtone livelier. Tick fade in and fade out, also you can set the time for this two effects.
PS: If the audio file itself is too loud of low, you can use our voice controller to strengthen or waken the voice. Make it more satisfied.

Step 4: set the target destination to save the ringtone
There is still one more thing we need to do before start converting, that is we need to find a place to save the output file. 4Media iPhone Ringtone Maker give you two choices to save your ringtone. One is to save in your PC, and the other is directly to your iPhone.

Click “Browse” to set a target place for your ringtone in PC. Also portable device is okay for storage.
There will have two more option below the Destination blank as the following picture shows:
Tick “Add to iTunes” to auto-upload the audio to iTunes to your preference.
Tick “Add to iPhone” to send the ringtone directly to your iPhone and then you can use it directly.

No comments:
Post a Comment